Texture Tips for Production
Creating Tiling Organic Textures with ZBrush & Photoshop by: Bradford Smith

_____My goal with this article is to walk you through a bit of my process for creating tiling organic textures with ZBrush and Photoshop, as it evolved throughout the production of the Caravan Level of Uncharted 3: Drakes Deception. I’ll be demonstrating my process through the creation of a rock surface using source material I created, but these techniques can been applied to a variety of other surfaces. The goal here isn’t to sculpt a highly detailed unique rock model; instead we will be looking at creating a library of useful tool and alpha assets and how to use them to quickly assemble a variety of rock textures. While quality is of utmost importance, being able to work fast is critical in order to be able to respond to the changing needs of production. Very late in the development stages of the Caravan level, I decided to re-apply everything I learned during production and completely re-did many of my rock textures, materials and blending in order to get much better visual results. It was a calculated risk that paid off, but I couldn’t have done it without a solid workflow that allowed me to move fast and get predictable results.
這篇文章的主旨,是指導你利用ZBrush和Photoshop完成原創連續貼圖流程的製作,如開發在秘境3:德瑞克的陰謀裡的大篷車關卡中的料件。我將進行展示我的過程,透過一顆我製作的岩石表面材質,不過這些技巧也可以被運用
在其它各種表面上。目標在這裡不是去雕刻一顆高品質獨特的模型;而是我們在材質庫尋找有用的料件(工具)和Alpha組件,並且如何使用它們去快速組合各種岩石材質。雖然品質極為重要,為了回應產品需求的改變,讓工作快速是關鍵。在開發篷車關卡的非常後期,我決定從新利用我在產品和我重做好幾次所完成的岩石貼圖,材質並且混合他們為了得到更好的視覺成果。這是一個可以承擔的風險,但我不能沒有一個扎實的工作流程,能讓我工作快速和得到預想的結果。
_____Reference: It goes without saying, but good reference is critical. Know which reference to use as well as which reference not to use in order to stay true to the characteristics of the subject. Stay organized and use photo viewers with databases for tagging and rating. When examining a subject or surface, try to simplify it. Similar to the construction of a drawing, break it down into silhouette and broad gestural forms, then into the smaller defining planes and finally the finishing surface details. Try to plan your work based on those assessments, they will help inform the creation of the tools you’ll need and right amount of details that will need to be on them. Usually the models will contain the silhouette and gesture, so the textures will need to compliment them nicely with the appropriate level of detail.Always be aware of scale and distance from viewer as they will play heavy roles in those assessments as well.
_____參考資料:不用多說,好的資料是關鍵。知道那些資料可以用也要知道哪些不能,為了保持主體特徵的真實。保持原貌並且使用照片瀏覽器在資料庫挑選和評等,當檢視一個主體或是表面,試著保持簡單,類似繪畫的結構,剖析它的剪影和邊緣形狀,並且在深入更小的自定區域,然後最後完成表面細節。試著以那些評估去計畫你的工作,他們會幫助告知你將需要的工具製作,和適量的細節將會需要在那些工具上。通常模型包含剪影(輪廓)和姿態,而貼圖將很棒的襯托出他們,運用適當的細節程度。總是要小心"縮放"和"觀眾的距離"如同他們也是在那些評估中扮演重要角色。
_____Tools: I found that my best results came from arranging carefully constructed tools that I could use over and over again to carefully add and subtract as desired. If each tool is sculpted to have distinct looks from at least 4 different views then you can go far with just a few tools. Spend time creating these building blocks and save them to a library. It’s also helpful to poly-paint these tools before creating textures with them in order to get more variation in hue and value into the final product. If you need to just see light and value, you can keep your poly-painting intact by modifying the MatCap to ignore diffuse color by setting Modifier > OverwriteColor to 1.
_____工具:我發現我最棒的結果是來自精心安排的構造工具(Ztool),我可以一用再用,如需求小心增加或減掉。如果每個Ztool有獨特的外表,至少4個不一樣面向,那你就可以只要用這些Ztool就行。花點時間製作磚牆並把它們變成資料庫。對這些Ztool作poly paint也有幫助,在製作貼圖前,是為了更豐富彩度和明暗度成為最終成品。如果你只是看光和明暗度,你可以保持你的poly-painting 完整,藉由MatCap忽略Diffuse color,可以設Modifier>OverwriteColor設為1。

Modeling & Rendering Form
模型和渲染型式
_____Now that I’m working in Zbrush for most of the texture creation process, my best normal maps came from careful attention to form and value. So being setup in a consistent, predictable manner helps me to achieve consistent results. I personally place much more emphasis on the sculpting of textures, than I do the color. If the form and cast shadow patterns aren’t both interesting and plausible, then it won’t make an interesting normal map and I won’t even start the diffuse color painting process.
_____現在,我工作中使用ZB,大多是在製作材質的過程中,我最好的Normal map來自小心注意在形態和明暗度。所以開始設定一個一致,可預期的方式,可以幫助我達到一致的結果。我個人會放重心在"貼圖雕刻"比我在色彩上的工更多。如果形態和投影的形式兩者都不有趣和不合理,那它就沒辦法成為一張有意思的Normal Map,而我也不會開始Diffuse Color的繪製。
_____現在,我工作中使用ZB,大多是在製作材質的過程中,我最好的Normal map來自小心注意在形態和明暗度。所以開始設定一個一致,可預期的方式,可以幫助我達到一致的結果。我個人會放重心在"貼圖雕刻"比我在色彩上的工更多。如果形態和投影的形式兩者都不有趣和不合理,那它就沒辦法成為一張有意思的Normal Map,而我也不會開始Diffuse Color的繪製。
_____Light: The default light in ZBrush is pretty good for general vertical plane textures as is. However, I find it helpful to preview my work with more defined cast shadows than the default lighting offers; even if my final render is going to have softer shadows for texture construction. It helps me to judge z-depth and a tool’s placement relative to neighboring tools when dropping them to the 2D canvas. Regularly taking a Grabdoc of the alpha is another good way to evaluate and ensure consistent z-depth across the canvas. Attention to z-depth is also an important factor in blending should you use your height map for that.
_____Light : 在ZB的預設光對大多垂直平面貼圖而言已經相當好用。然而,我發現使用更多的自訂義的cast shadows可以幫助我預覽我的工作,更勝於預設光。即使我最後的算圖,為了貼圖結構,會用較柔和的陰影。當我將Ztool拖到2D畫板上,這可以幫我判斷Z-Depth和Ztool的位置與它相關鄰近Ztool。通常採取Alpha裡的Grabdoc功能是另一個好方法去評估和透過畫板確認Z-depth。注意z-depth在混接(Blending)中,也是一個重要因素,你也應該使用你的Height Map在Blending上。

_____For more defined shadows, start by moving the light
just slightly up and reducing the Light > Shadow >
Aperture setting in the light palette.
為了更明確的陰影,藉由輕微提亮燈光,並在燈光面板中,減少Light > Shadow > Aperture (曝光)。
Materials: When I’m modeling in ZBrush I prefer the
WhiteCap White as a neutral sculpting shader. With its
slightly edgy look, I actually find that it keeps me from
making normal maps that are too aggressive and helps
me balance simple, clean forms with smaller superficial
surface details that I can adjust the presence of later. I
also found it to be a useful direct light render pass for texture
construction, so I modified a basic shader to give me
the same visual result yet work with the light palette.
材質 : 當我在ZBrush塑模時,我較喜歡WhiteCap的白色當成一個中性雕刻的shader,因為它的輕微邊緣的外型。事實上,我發現它讓我避免製作Normal Map太過冒險並幫我平衡簡單,乾淨的外形,搭配較小的表面細節,而我可以之後調整目前的狀況。我也發現它成為有用的直線光算圖pass,在貼圖構成裡。所以我修改基本shader,在燈光面板中,讓我有同樣的視覺結果。
Cavity Detection & Classical Value Structure: While the cavity feature is very useful for many things, I prefer a more classical approach to rendering form in my direct pass. I like surface details to be saved for the light-side and shadow details to appear soft. I prefer to set up ZBrush’s cavity controls to lend a bit more detail to the light-side while keeping shadows softer. You can do that by giving your Cavity Radius a negative value, and raising your Cavity Diffuse just a bit. It gives a bit of light edging to the edge intersections of planes that add a nice touch to final diffuse textures. If I need one, I’ll render out hollow cavity passes later and blend these layers together to control light and shadow detail independently in Photoshop.


Automation : To keep some predictability and consistency to my work, as well as to save time, I set up actions that composite all my layers just the way I want them as determined by a bit of testing. From here I can adjust as needed. It’s definitely worth investigating good automated practices in areas of your workflow through actions and batching. Freeing up tedious tasks
自動化:在我的工作中,保持一些預測性和一致性,也能省下時間,我設置Actions,合成我所有圖層,這樣我可以藉由一些測試決定。從這我可以調整所需,透過action和batch批次在你的工作流程的環節中,這絕對值得投資在好的自動化做法。騰出一些冗長工作可以讓你有更多時間做創意決策。在下面的圖層堆裡,所有的圖層被整合,群組,混合模式,不透明度,遮罩,並設定,過程都在Action中完成。而我必須要做的就是確認上面四種算圖結果和適當的取名。在這流程之後,我可以依需求細修我的預設。


 基本灰階 Local value
 基本灰階帶AO Local value with AO
 Lit 沒有基本灰階(上層) 和有基本灰階(下層)

快速漫反射色彩技巧:因為我通常著重在為Normal Map製作有趣的形狀,我沒有花很多時間在Color Map上,除非等到我在遊戲完成normal和高興得完成雕刻後。所以為了讓遊戲的某事快速,我有一些技術可以從normal map 進化,可以很快的得到漫反射色彩和specular map。
深度和裂縫色彩圖層 : 如果我沒有在ZB裡使用Poly-painted畫貼圖,我通常會快速建立純色圖層,去混和預先做好的連續貼圖,我通常會在參考資料上取色,我就可以快速透過Height map和AO mask建立,這允許我快速工作並重複利用在基本色彩和貼圖細節。
細節的Masks : 我時常使用到,不管我已經有方便的AO或我的normal map的綠通道,去mask細節。這些可以被單獨使用或合併為的是mask材質圖層,做出髒污或砂礫的準備。在ZBrush的Outline材質的變化,是很棒的mask,拿來快速疊加一些邊緣細節。
使用Material去獲得色彩訊息 : 從訂製的materials得到色彩圖層可以省下很多繪製時間,並且快速達到的東西,很難被塗改。例如,一個被編輯的Gradient Map material可以被利用通過岩石表面的形,得到水平條紋,Fiber material 對青苔與草來說是很棒的。對大量草地,這個material可以透過ZBrush's shader layer被編輯,也能去算出客製normal maps 和matte。
色彩校色 : 我通常不會只讓我的色彩和灰階對比在這些圖層中放置就開始,所以我總是擺一些色彩校色在所有圖層的最上方。我偏好一個curve adjustment layer並調整每一個通道,得到輕微的色彩變化遍及整個光罩區域,這比微調每一個單一圖層快上許多。更好的是,如果我有一組PSDs,只要換掉同樣外表的種類即可,我可以快速更新他們,藉由我的CC(如果我需要),而我還能打包!


一個GradientMap(色階貼圖) material編輯版本和客製材質被利用製作一張水平條紋的MASK,跟隨著岩石表面的外型。(上方)
客製化的Fiber materials被利用算出在岩石上的草。(下方)


主修 Computer Animation,畢業於Ringling College of Art & Design,曾經在EA工作六年半,變成資深場景美術組長。我在頑皮狗曾參與有才華的團隊,擔任材質藝術家,在秘境探險3的中期。我著重在研發和製作Caravan關卡。
_____Light : 在ZB的預設光對大多垂直平面貼圖而言已經相當好用。然而,我發現使用更多的自訂義的cast shadows可以幫助我預覽我的工作,更勝於預設光。即使我最後的算圖,為了貼圖結構,會用較柔和的陰影。當我將Ztool拖到2D畫板上,這可以幫我判斷Z-Depth和Ztool的位置與它相關鄰近Ztool。通常採取Alpha裡的Grabdoc功能是另一個好方法去評估和透過畫板確認Z-depth。注意z-depth在混接(Blending)中,也是一個重要因素,你也應該使用你的Height Map在Blending上。

_____For more defined shadows, start by moving the light
just slightly up and reducing the Light > Shadow >
Aperture setting in the light palette.
為了更明確的陰影,藉由輕微提亮燈光,並在燈光面板中,減少Light > Shadow > Aperture (曝光)。
Materials: When I’m modeling in ZBrush I prefer the
WhiteCap White as a neutral sculpting shader. With its
slightly edgy look, I actually find that it keeps me from
making normal maps that are too aggressive and helps
me balance simple, clean forms with smaller superficial
surface details that I can adjust the presence of later. I
also found it to be a useful direct light render pass for texture
construction, so I modified a basic shader to give me
the same visual result yet work with the light palette.
材質 : 當我在ZBrush塑模時,我較喜歡WhiteCap的白色當成一個中性雕刻的shader,因為它的輕微邊緣的外型。事實上,我發現它讓我避免製作Normal Map太過冒險並幫我平衡簡單,乾淨的外形,搭配較小的表面細節,而我可以之後調整目前的狀況。我也發現它成為有用的直線光算圖pass,在貼圖構成裡。所以我修改基本shader,在燈光面板中,讓我有同樣的視覺結果。
Cavity Detection & Classical Value Structure: While the cavity feature is very useful for many things, I prefer a more classical approach to rendering form in my direct pass. I like surface details to be saved for the light-side and shadow details to appear soft. I prefer to set up ZBrush’s cavity controls to lend a bit more detail to the light-side while keeping shadows softer. You can do that by giving your Cavity Radius a negative value, and raising your Cavity Diffuse just a bit. It gives a bit of light edging to the edge intersections of planes that add a nice touch to final diffuse textures. If I need one, I’ll render out hollow cavity passes later and blend these layers together to control light and shadow detail independently in Photoshop.
Cavity 偵測 與 典型明暗結構:當cavity特性對許多製作事情是非常實用時,我傾向用更典型的方法去算外型,在我的direct pass裡。我喜歡表面細節為light-side保存並陰影細節顯示柔順。我傾向設置Zbrush的cavity控制借一些細節到light-side.當保持陰影柔順,你可以給你的cavity radius一個負值,並提高cavity diffuse一點點。這會給一點光邊在平面邊緣交會處,增加一個潤飾在最後Diffuse貼圖上。如果我需要它,我將會算出中空cavity pass之後,再到photoshop裡,混接這些layers,去獨自控制燈和陰影細節。
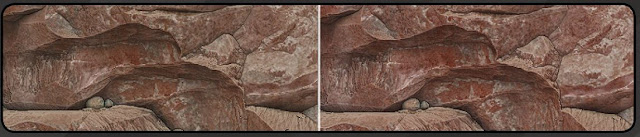
______Compare a lighter edge focused cavity setting (left), with a darker hollow focused cavity setting (right)
比較一個較亮邊緣強調的cavity設置(左),和較暗中空強調的cavity設置(右)

Texture Construction
貼圖結構
Combined Lighting: Before I start working on my diffuse color map I always get my lighting setup inside of the PSD. I do this so that I can continually check my color map with my texture baked lighting to make sure they don’t fight each other. I generally like to use a few different renders from ZBrush to get my combined lighting in photoshop. I always have an AO render, and I usually choose supplementary renders based on these two goals:
合併lighting : 在我開始製作我的diffuse color貼圖,我總是在psd內,取得我的light setup.
我這麼做,因此我可以繼續檢查我的color map,和我的貼圖烘培燈光,去確定不會互相干擾。我通常使用一些從ZB
算出不一樣的renders,然後到ps合併我的lighting.我總是有一張AO並且我通常選擇補充算圖,在這2個目標上。
算出不一樣的renders,然後到ps合併我的lighting.我總是有一張AO並且我通常選擇補充算圖,在這2個目標上。
1. Something to control detail in the shadow-side.
在陰影裡,有些東西可以控制細節。
2. Something to control detail in the light-side.
在光邊裡,有些東西可以控制細節。
My solution most of the time ends up being one of the Framer materials and a Gummy material; if not a custom material.
我的大部分的解決方案,都是在一個 Framer材質和一個Gummy材質下完成,如果沒有自定意的材質球情況下。

Automation : To keep some predictability and consistency to my work, as well as to save time, I set up actions that composite all my layers just the way I want them as determined by a bit of testing. From here I can adjust as needed. It’s definitely worth investigating good automated practices in areas of your workflow through actions and batching. Freeing up tedious tasks
will allow you more time to make creative decisions.In the layer stack below, all of the layer organization, grouping, blend modes, opacity, masks and settings were all done by an action. All I have to do is make sure the above 4 render passes are present and named properly. After it sets me up I can tweak my default settings as needed.

Lighting Notes: Looking at my layer stack on page 101,
there are a few things worth pointing out about this
process and setup:
燈光注意:請看我在101頁的圖層堆,有一些值得提出的過程與設定。
燈光注意:請看我在101頁的圖層堆,有一些值得提出的過程與設定。

Set Black Point: Determining the blend mode and percentage of each layer was actually pretty easy with a few basics in mind. Lighting passes like the direct and AO I prefer to multiply. When I’m determining the appropriate contribution from each layer I’m paying attention to 3 things: my black level, dark-light relationship and sharpness of detail (in and out of shadow). But probably the most important and first thing I want in place is black level, or my darkest shadow values. I want them dark, but I want padding in the shadow side of the histogram as well. The detail renders are usually blended as soft light and weighted by the direct pass to control light and shadow detail.
設定黑點:在我想法中,用一些基本選項,決定混合模式和每個圖層的百分比,是想當簡單。Lighting pass像是direct 和AO pass我偏好用multiply.當我決定每個圖層適當的作用後,我會注意三件事,我的黑階,暗處與光的關係和細節銳利化(陰影的裡外)。但可能最重要且我會擺在首要的事,就是黑階。或是我最黑的陰影階層,我想要它們變黑,但我也想延伸陰影邊緣。這細節渲染通常和柔光混合並被direct pass 加重,去控制光和陰影的細節。
Placing Local Value: I placed a neutral grey of 128, 128,128 at the bottom of my stack to act as local value in order to make this step simpler. After setting up my passes things have got pretty dark, so I’ll “expose” up a bit by using a curves adjustment layer and dragging the middle of the slider up. My only goal here is to place that local value somewhere in the half-light region of my light-side. Use the Info window in Photoshop to help pinpoint that value. If I do this properly, then my diffuse color only, AO, and lit versions of my textures should in more harmony with each other, anchored by local value placement. It’s good practice to keep a close eye on the Histogram window; when comparing the lit and AO versions, the graphed values of the lit should look like they are relaxing and expanding around the range set by the AO with a trend toward the local value. The graph should not even out and feel like it dove to the left. Doing this will help keep your textures in harmony should they be
used in the same or similar lighting environments.
 info window
 Histogram window
放置基本灰階 : 我放置中性灰128 128 128在我的圖疊底層,當作基本灰階,為的讓這步驟簡單。把我的passes設定完,會變得比較暗,所以我用"Curve 調整圖層"曝光,並把它拖到中間。我在這裡的唯一目標,就是把Local value放在我的光緣的半光某處(這邊不是很懂),使用PS的Info視窗,可以設描點知道灰階。如果我做的適當,之後我的貼圖diffuse color, AO,lit(應該是Light)的版本應該會更和諧,藉由基本灰階為基礎。密切注意Histogram視窗是
不錯的作法;當比較lit和AO版本時,lit的圖像灰階應該會是鬆散並且擴展到AO設置的範圍,透過驅近基本灰階。圖表不應平坦而是往左下降。這麼做可以保持你的貼圖和諧,他們應該要被利用於一樣或類似燈光的環境。
不錯的作法;當比較lit和AO版本時,lit的圖像灰階應該會是鬆散並且擴展到AO設置的範圍,透過驅近基本灰階。圖表不應平坦而是往左下降。這麼做可以保持你的貼圖和諧,他們應該要被利用於一樣或類似燈光的環境。
info window Histogram window
Compare Local Value (top) with AO Version (middle) with Lit w/o Local Value Placed (bottom top) and w/ Local Value Placed (bottom lower) (註 : w/o= without ; w/ = with )
比較基本灰階(top) 和AO(中間)和Lit 沒有基本灰階(底部上層) 和有基本灰階(底部較低)
 基本灰階 Local value
 基本灰階帶AO Local value with AO
  Lit 沒有基本灰階(上層) 和有基本灰階(下層)
Weighted AO (and other layers): You can always spot an image that has had its AO pass multiplied over the combined lighting. It’s important to remember that the AO is part of the ambient lighting and should be treated as such. A simple example of a typical composite with combined lighting would be: ((Ambient*AO)+Direct)*Diffuse Color. The addition of the direct light greatly reduces the visibility of the ambient occlusion. So, for vertical plane textures I generally like to assume some kind of soft top-down hemispherical light source, and give a bit more light (and detail) to my Y facing texture planes. It keeps things still feeling natural, but makes things pop a bit more as you get more play between light and shadow forms. A simple technique used here is to just weight your AO multiplication by the inverse of your direct.
加重AO(和其他圖層):你總是可以發現一張圖總有它自己的AO pass疊加在合併的光上。很重要要記得AO是環境光的一部分,並且應該被這樣使用。一個典型合成的簡單例子,用lighting合併:((Ambient*AO)+Direct)*Diffuse Color,此外,Direct light會大幅降低AO的可視性。所以,對垂直平面貼圖,我通常會假設某種半球型光源,並給一些光在我的Y軸貼圖平面,它可以讓他保持自然,但會讓它有些明顯,當你操作光和陰影外型時。一個很簡單的技巧在這被利用,就是加重你的AO疊加,藉由反轉你的光。
______Compare non-weighted AO (left) and weighted AO (right); both with and without shadow pass.
比較沒有AO加重(左邊)和加重AO(右邊) : 兩邊都沒有使用shadow pass 
Quick Diffuse Color Tips : Because I’m usually focused on creating interesting forms for normal maps, I don’t spend a lot of time working on a color map until I’ve checked out the normals in game and am happy with the sculpt. So in order to drop something in game fast I have a few go to techniques for quickly getting diffuse color and specular maps done for normal map evaluation.
Depth & Crevice Color Layers : If I haven’t poly-painted the texture in ZBrush, I’ll usually quickly build up layers of solid color mixed with layers of pre-made tiling texture. I usually have sampled colors picked from reference that I’ll quickly build up through height map and AO masks. It allows me to work fast and iterate on the local color and texture detail.
Detail Masks : A lot of times I’ll use whatever I already have handy like my AO render or the green channel of my normal map to mask detail. These can be used alone or combined in order to mask texture layers for grunge or sand buildup. A variation on ZBrush’s Outline material is good mask for quickly overlaying some edge detail.
Using Materials to Capture Color Information: Getting color layers from custom materials can save a lot of painting time, and quickly achieve things that would be hard to paint. For example, a modified Gradient Map material can be used to get horizontal striations across the forms of the rock face. The Fiber material is also great for moss and grass. For larger grasses, the material can be modified through ZBrush’s shader layers to render custom normal maps and mattes as well.
Color Correction: I often don’t get the color and value contrast set just right in these stacks to start, so I’ll always put some color correction toward the top of the layer stack. I prefer a single curves adjustment layer and like to adjust per channel to get subtle color shifts throughout the luminance range. It’s a lot faster than re-tweaking individual layers again. Even better, if I have a set of PSDs that are just variations on the same surface type, I can quickly update them all by simply updating my color correction if I need to; which I can also batch!
色彩校色 : 我通常不會只讓我的色彩和灰階對比在這些圖層中放置就開始,所以我總是擺一些色彩校色在所有圖層的最上方。我偏好一個curve adjustment layer並調整每一個通道,得到輕微的色彩變化遍及整個光罩區域,這比微調每一個單一圖層快上許多。更好的是,如果我有一組PSDs,只要換掉同樣外表的種類即可,我可以快速更新他們,藉由我的CC(如果我需要),而我還能打包!

The combined AO and green channel mask for sand and result (top); The custom ZBrush Outline mask and detail overlay result (bottom)
把AO和綠通道mask(沙粒)結合,合成結果(上方) ;客製ZB Outline mask和細節疊加結果(下方)
A modified version of the GradientMap material and a custom texture were used to create a mask for horizontal striations that follow the forms of the rock face. Custom Fiber materials were used to render passes for grassy top planes.
客製化的Fiber materials被利用算出在岩石上的草。(下方)

The uncorrected colors (left) and corrected colors using curves (right)
左邊是未校色的,右邊是使用curve校色的。
Quick Specular Tip : A simple thing to do in order to get a fast specular map is to use the Channel Mixer Adjust Layer. Set it to gray and move the sliders to get the best balance of even lighting and detail contrast. The best part is that it’s non-destructive and keeps doing its thing; so if I have it inside of a group above my color group, then every time I update my diffuse map to check it in game, I can quickly re-export an up to date, matching specular mask. For textures with a wider color gamut that need finer tuning, another useful tool is the Black & White Adjust Layer. These two adjustment layers can easily get you 75% of the way there.
快速反光技巧 : 為得到一張快速specular map,一件簡單的事要做,就是使用Channel Mixer Adjust Layer.設定它灰色,並移動把條,讓平均光線和細節對比得到最好的平衡,最棒的事,它非破壞性的,並且可以保持它的物件。
所以它在我的我的色彩群組的上層群組,然後我每次只要更新diffuse map就可以在遊戲內觀察,我可以很快重新輸出,符合specular mask。對廣色域的貼圖需要微調,其他實用的Black & White adjust layer,這兩種adjustment layer可以輕鬆讓你在此有75%的使用。


所以它在我的我的色彩群組的上層群組,然後我每次只要更新diffuse map就可以在遊戲內觀察,我可以很快重新輸出,符合specular mask。對廣色域的貼圖需要微調,其他實用的Black & White adjust layer,這兩種adjustment layer可以輕鬆讓你在此有75%的使用。


About Me
After graduating with a BFA in Computer Animation from Ringling
College of Art & Design, I was hired at Electronic Arts Tiburon
where I worked for six and half years and became the Senior Lead
Environment Artist. I joined the talented team at Naughty Dog
as a Texture Artist in the middle of Uncharted 3 development,
where I focused on the development and production of the Caravan
level.
有關作者
沒有留言:
張貼留言